Thursday, September 30, 2021

Beauty of Friendship Watercoloured Notecard

 Hello and thanks for visiting!

Today I create with orange in recognition of National Day for Truth and Reconciliation here in Canada.  The sentiment on the card is 'Thinking of You' from the Beauty of Friendship stamp set.  Because I am thinking of my indigenous friends and working to understand my role and responsibly as I raise awareness of the very tragic legacy of residential schools, and to honour the thousands of Survivors.  

This watercoloured card is added to a Very Vanilla Note Card base.   And features the gorgeous Meadow Moments Embossing Folder that fits in the Mini Stampin' Cut & Emboss Machine, (SCEM).  The Global Design Team #311 Theme Challenge for this week is leaves, and this embossing folded has falling leaves which I've added a watercolour wash to.  There's two in the pack, one is an overall embossed pattern with flowers, butterfly's and leaves, but the one I've chosen is the falling leaves, perfect of course for this time of year.


Click on the image to visit GDP #311

 Please click on either my card or the GDP image to visit their blog.


And here's the card details:

Very Vanilla Note Card

3 7/16 x 4 15/16 Pumpkin Pie cardstock (CS)  ***Trix, This size leaves just a smidge of Very Vanilla peeking out.  To cut, place the Pumpkin Pie CS at the 3 1/2 & 5 inch mark on the Stampin' Trimmer and then move it by a fraction of an inch less.

3 1/4 x 4 3/4 Fluid 100 Watercolor Paper

5/8 x 2 1/4 Scrap piece of Very Vanilla CS for the sentiment

Meadow Moments Embossing Folder

Beauty of Friendship stamp set

Ink:  Calypso Coral, Bumblebee, Cajun Craze, Pear Pizzazz for the leaves   *Pumpkin Pie for the sentiment

Waterpainters

Pale Papaya Open Weave Ribbon coloured with Light Pumpkin Pie Stampin' Blends Marker

Wink of Stella

*****Click here, to shop Lesley's Online Store for the supplies to make this card*****


Assembly & Trix:

*  Adhere the Pumpkin Pie CS layer to the Very Vanilla Note Card base.

*  Emboss the Watercolour paper using the embossing folder and the Mini SCEM.

*  Apply a layer of water to the watercolour paper using the largest waterpainter.

*  Dab on the fall ink colours randomly to create a fallen leaf look.  ***Trix, With the ink pad closed, squeeze the case to transfer a bit of ink to the lid of the case, then add a tiny bit of water from the smallest water painter to create a pool of diluted colour.  Apply the colour with a dabbing motion to the watercolour paper and watch how it moves and resists the fibres of the paper, add more where needed. 

*  When the watercoloured layer is dry add Wink of Stella.  ***Trix, use the cap of the Wink of Stella brush and tap the brush to flick sparkles onto the card.  

*  Stamp the sentiment in Pumpkin Pie ink and adhere to the card with Stampin' Dimensionals.

*  Colour the Pale Papaya Ribbon with the Light Pumpkin Pie Marker.  ***Trix, Cut the ribbon lengthwise through the middle of the weave to create two long strips of ribbon to add dimension.

*  Tie the ribbon around the watercoloured  layer and knot.  Adhere to the Pumpkin Pie layer with dimensionals.


Enjoy and have a super day!


Wednesday, September 29, 2021

Soft Succulent Christmas Card

 Hello and thanks for visiting!

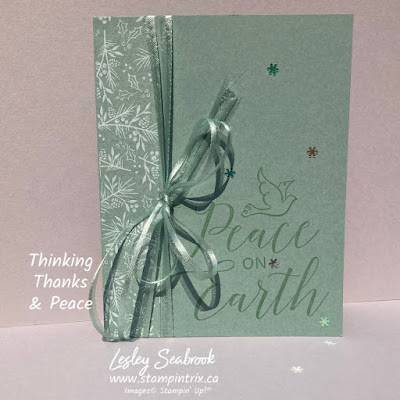
Today's card is inspired by the colour Soft Succulent.  It is part of our 2021-2023 In Color Collection.  I love the soft quiet feel of this colour, so I added the 'Peace on Earth' sentiment from Thinking Thanks & Peace stamp set.  The adhesive backed snowflakes are available on my clearance store.  Click here, to shop the clearance section of my online store   

This versatile stamp set comes with four big greetings, perfect for simple cards, or with Designer Series Papers (DSP)  I featured the 'Sending Thanks' sentiment here August 16th , and the 'Boo' card from this blog post  Watch for an upcoming post using the 'Thinking of You' sentiment.  


And here's the card details:

4 1/4 x 5 1/2 Soft Succulent card base  # 155776 (5 1/2 x 8 1/2 folded in half portrait orientation)

1 x 5 1/2  Tidings of Christmas patterned paper  #155718 

Thinking Thanks & Peace stamp set  #156552

Soft Succulent Ink  #155779

Adhesive Backed Snowflakes  #153548

Soft Succulent Open Weave Ribbon  #155780 

*****Click here, to purchase Thinking Thanks & Peace on my online store.  

Please remember to use the Host Code (found on the right side bar) when your order totals $60 or more and I will send you an thank you gift in the mail the following month along with a thank you card.  The Host Code for September is HRKS43TY


Assembly & Trix:

*  Adhere the Soft Succulent patterned paper to the card base with Multipurpose Liquid Glue (glue)

*  Stamp the sentiment using Soft Succulent ink onto the card base.

*  Tie Soft Succulent ribbon around the card base and tie it near the sentiment.  ***Trix, to create dimension on the care, cut the ribbon in half lengthwise in the weave section to create two long strips, hold them together and tie the bow.  

*  Apply adhesive backed snowflakes to the card around the sentiment.

*****That's it! Simple & Pretty!*****


Enjoy and have a super day!


A New Suite of Products is coming! Eden's Garden Available Nov 2

 Hello and thanks for visiting!

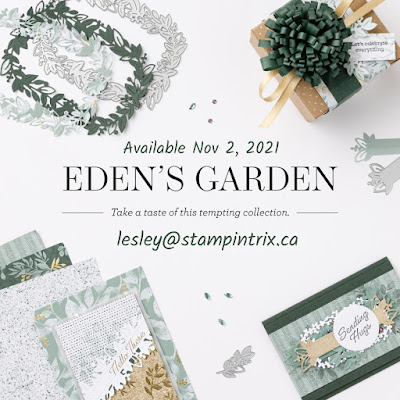
Stampin' Up!® is always surprising us with new stamp sets!  Today we've been introduced to an exclusive, early release (from the new January 2022 Mini Catalogue)  collection of products called Eden's Garden.  A stamp set, dies, designer series paper, gems, the list goes on,.....  This suite will be available to purchase as early as November 2, 2021 and it looks lovely!   

If you'd like to preorder this suite in October  then Join Stampin' Up!®  Yes that's right, Stampin' Up!® offers demonstrators an opportunity to preorder products from new catalogues.  Being a demonstrator means you've purchased the Starter Kit, that's it, there is no requirement to sell SU product in future.  As a demonstrator you are able to receive Stampin' Up!® products at a discount.  For more Info please contact me at lesley@stampintrix.ca  I'm always happy to talk about the company and products I love!  


Click on the image to Join Lesley's Stampin' Trixsters Team


The sample recipes Stampin' Up!® has made available on our demonstrator website today look fantastic.  This is definitely a set that can be used for Christmas.  There is new 'Cotton Paper' !  The colours within the designer series papers are patterns of Evening Evergreen and Soft Succulent, stems, sprigs, berries and twigs.  There's gold foil, and beautiful little gems, some are Cherry Cobbler coloured.  Feels Christmasy to me :)   

Enjoy and have a super day!


Monday, September 27, 2021

Love It Chop It with Tidings of Christmas DSP

Hello and thanks for visiting!

Today's card was inspired by fellow Team STIC sista Serena.  I loved the simplicity of using a beautiful Designer Series Paper, (DSP) a versatile punch, and some bling, and bam! you're done!  I'm all about simple cards at Christmas.  Love It Chop It, is a wonderful way to use DSP and create cards in a snap.  You can even cut a whole pack of paper, in standard card sizes so you're ready to go.  If you'd like to check out the 'Love It Chop It' master, click here, to visit Kylie Bertucci in Austalia and see her Love It Chop It video on YouTube.  Kylie created 'Love It Chop It'!


And here's the card details:

It really is as simple as it looks.  Start with an Evening Evergreen card base, add a piece of Tidings of Christmas DSP, 3 x 5 1/2

Wrap a piece of Soft Succulent ribbon around the card and tie a bow.

Stamp the greeting from the Best Year stamp set with Evening Evergreen ink on Basic White, and punch it out with the Everyday Label punch.  Adhere to the card base with Stampin' Dimensionals

Yep that's it, super easy right?  Love It Chop It!  :)


To purchase the supplies used on this card please click here, Lesley's online store 

*Evening Evergreen cardstock #155574  *Tidings of Christmas DSP #155718  *Best Year stamp set #152568  *Everyday Label Punch #144668


If you'd like to be part of a group that loves to create cards, consider Joining Stampin' Up!®  by purchasing the Starter Kit.  Please email me at lesley@stampintrix.ca for more information about all the fabulous perks of being part of the Stampin' Up!® community.  Or click on the image to Join by purchasing the Starter Kit.


Click on the image to Join Stampin Up!®


*****In addition to the already awesome Stater Kit value - please choose an additional bundle of products from the image below.  This extra value is available during Sale a-bration and ends September 30th, 2021

*Choose $165 of Stampin' Up!® product from either catalogue

*****Pay $135 No taxes No shipping in most provinces*****

*Chose and additional bundle from below

*Receive a Paper Pumpkin Kit free


Enjoy and have a super day!

Friday, September 24, 2021

#simplestamping Halloween Birthday

Hello and thanks for visiting! 

I just had to make another harvest moon card using the fabulous To The Moon stamp set.  This time I combined it with Welcoming Woods just to see how it looked.  Well then, the card took on an eerie feel and I immediately thought Halloween :)  More specifically, Halloween Birthday, for my very good friend who loves Halloween, and her birthday is at the end of October, perfect! 

The first card I created earlier this week, see it here, To The Moon with Campology , describes how I created the background with Blending Brushes.  Here's today's change up of stamp set.


The 'Boo' is from Thinking Thanks & Peace stamp set.  Initially I used White Craft Stampin' Ink, because I really wanted to keep this card as simple as possible - a SIP card = Stamps Ink & Paper - however the 'Boo" didn't stand out enough, so I Heat Embossed it with White Embossing Powder.

Here's the inside, you'll see the difference, the trees are stamped using Craft Stampin' Ink. (Item #147277)  I used White Stampin' Emboss Powder for the Happy Birthday from the Party Puffins stamp set, (Item 155054). 


Click here, to shop Lesley's online store  for the supplies I used on this card.

*Remember to use the Host Code (found on the right side bar) when your order is $60 or more, and then I can send you a thank you in the mail the following month.  The Host Code for September is HRKS43TY*


Click the image to purchase the Starter Kit and Join Stampin' Up!®


*Until September 30th 2021 you can purchase the Starter Kit and receive additional freebies.  During Sale a-bration  purchase your choice of products for a Starter Kit, and Stampin' Up!®  will give you a bundle of your choice from the image below.  As well you will receive a Paper Pumpkin Kit.   There is no shipping and no tax, in most provinces, when you purchase the Starter Kit.  

*You choose $165 worth of product

*You pay $135, no tax & no shipping

*You receive a free bundle & a Paper Pumpkin Kit

*There is no further commitment from you.  You are simply purchasing a kit of supplies, during an extra big sale - it's simply great value for your dollar.


Please contact me at lesley@stampintrix.ca for more information.  I am always happy to talk about the company and products I love!


Enjoy and have a super day!


Thursday, September 23, 2021

Hand Penned Designer Series Paper, Meadow Dies & Peaceful Moments stamp set

 Hello and thanks for visiting!

Today's card is a birthday card I made for a special person a few months ago.  It features the fantastic Hand Penned Designer Series Paper.  There is no way I'd think to combine these colours together, but leave it to the Stampin' Up!® artists to create a paper that I absolutely love! 


As I said I made this card a bit ago and of course forgot to write the measurements down, so I'm going to wing it with the description for you.  And as I always say, start with a general idea and make it your own.

***Trix, I always take my colours from the Designer Series Paper (DSP)  this print features Garden Green, Cinnamon Cider, Mint Macaron and Pool Party - as I said the SU artists inspire me to create colour combinations I'd never think of.

I've noticed 'slimline' cards can be different measurements, but they're always long and narrow, so for this card I used 8 x 3 1/2.


And here's the card details:

8 x 3 1/2 Garden Green card base  (8 x 7 folded in half portrait orientation)

7 7/8 x 3 3/8 Hand Penned DSP 

Cinnamon Cider, Garden Green & Mint Macaron scraps for die cut flower stems

Garden Green ink

Linen Thread & Gold Fine Art Ribbon

Peaceful Moments stamp set

Stitched Rectangle Dies


Assembly & Trix:

*  Adhere the DSP to the card base with Multipurpose Liquid Glue (glue)

*  Die cut the floral images from the cardstock colours.

*  Stamp the sentiment in Garden Green ink and cut out with a Stitched Rectangle Die.

*  Adhere the Gold Fine Art Ribbon to the back of the stitched rectangle with Stampin' Seal. 

*  Adhere the ribbon and sentiment rectangle to the card base with Stampin' Dimensionals.

*  Assemble the floral die cuts together with Linen Thread.  ***Trix, tightly wrap the die cuts with the linen thread and tie a knot.  Then tie a big bow using linen thread around the knot.  Apply a Mini Glue Dot to the back of the bunch of floral stems.    *Also apply tiny drops of glue to the wider parts of the die cuts, and adhere to the ribbon *and dsp layer

*  That's it, enjoy the beauty for colour coordination!


If you love Stampin' Up!® colour coordination and you want it all, consider joining Stampin' Up!® by purchasing the Starter Kit.  *No, you don't have to sell Stampin' Up!® products unless you choose to - its' completely up to you, you are simply purchasing the Starter Kit.  

  Choose $165 worth of products from the catalogue and pay $135 - Stampin' Up!® covers the cost of tax and shipping in most provinces!  *****So for example - The Stamp Cut & Emboss Machine is $163, you can choose that, plus something extra to get to $165 *But* you pay $135 no taxes and no shipping! 

*Hands down the Starter Kit is the best value for your money* 


Please contact me at Lesley@stampintrix.ca.  I'm always happy to talk about the company and paper crafting products I love    - OR -  Click the image to Join the Stampin' Up!® community.


Click the image to visit the Stampin' Up!® Join page to purchase the Starter Kit


*****Until September 30th 2021*****

Receive a free bundle of you choice from the image below *And a free paper Pumpkin Kit.  Yes, all for $135.  It's the Sale a-bration promotion!


Enjoy and have a super day!


Christmas Whimsy Card Kit

 Hello and thanks for visiting!

I have something a little different for you today, Stampin' Up!® has added a new all inclusive card kit to their kits collection, it's called Christmas Whimsy Card Kit.  It coordinates with one of my favourite stamp sets, Whimsical Trees.  Please click here, to see a post using the Whimsy & Wonder Suite using the fabulous Whimsy & Wonder Specialty Designer Series Paper and Whimsical Trees stamp set. 


Click the image to shop the kit on Lesley's online store


The Christmas Whimsy Card Kit is shown on Page 7 of the Mini Catalogue (July - December 2021)   Item # 158166 and is available for $26 in Canada.  Click here, to shop for the kit on Lesley's online store

Click here, Christmas Whimsy Card Kit to see a video of the card kit with our very own Sara Douglas CEO of Stampin' Up!®  


  • The Kit contains enough supplies to create eight cards—4 each of 2 designs.
  • Includes printed card bases, printed die cuts, adhesive, embellishments, gold foil die cuts, gold twine, and coordinating envelopes with gold foil accents.
  • Includes an exclusive stamp set and a Night of Navy Classic Stampin’ Spot.
  • Finished card size: 5-1/2" x 4-1/4" (14 x 10.8 cm)
  • Coordinating colors: Balmy Blue, Basic Gray, Crumb Cake, Evening Evergreen, Gray Granite, Misty Moonlight, Poppy Parade, Real Red, So Saffron, Soft Succulent, Soft Suede


Enjoy the video and have a super day!

Tuesday, September 21, 2021

To the Moon with Campology for the 1st Day of Fall

 Hello and welcome to the 1st day of fall, thanks for visiting!

Today's birthday card is for my fabulous husband.  He loves camping in the fall and since it's the first day of fall I chose to create a Harvest Moon.  This card is also a single layer SIP card, (Stamps, Ink & Paper) the Stampin' Up!® creative challenge for this month is to create a birthday themed SIP card.  Also the theme for the Paper Players PP559 Clean-and-Simple Challenge is Fall Fun!  So whew, I'm checking off a lot of boxes with this little gem :)   

Please check out all the inspiration from the Paper Players Challenge by clicking on either my card or the Paper Players image to visit their blog.  


And here's the card details!

4 1/4 x 5 1/2 Thick Basic White cardstock (CS)  (4 1/4 x 11 folded in half portrait orientation)

To The Moon stamp set

Campology stamp set

Art Gallery stamp set

Ink Night of Navy, Pale Papaya, Evening Evergreen, Tuxedo Black Memento

Evening Evergreen Stampin' Blends Markers 

Blending Brushes

Stamparatus™


Assembly & Trix

*  I love using the Stamparatus™ to create cards when using a few images.  It allows me to position the stamps where I wish and practise before I create the card.

*  Stamp the moon using Pale Papaya ink.

*  Stamp the trees using Evening Evergreen ink.

*  Stamp the tent using Black Memento ink.

*  Cover the moon with a sticky note.  ***Trix, I used a circle from the Layering Circle Dies, there's one that fits perfectly!

*  Blend Night of Navy ink using a Blending Brush.  ***Trix, tap the ink pad and swirl the colour into the blending brush on a piece of scrap paper then start blending on the card, this helps to create a light distribution of ink *remember less is more :)  you can always build up the colour and layer it on more as you go.

*  Blend Evening Evergreen ink to the base of the card and around the trees a bit.

*  Colour the tent using the Evening Evergreen Stampin' Blends markers.

*  Stamp the sentiment using Evening Evergreen ink.

That's it, voila done!  Enjoy!  I always find colouring with the Blending Brushes so relaxing.  Have a super day!


*****Please remember if you'd like to shop my online store to #makeacardsendacard for someone special in your life, please use the Monthly Host Code (found on the right side bar) I'm happy to send a thank you gift to you the following month when your order is $60 or more.  The Host Code for September is HRKS43TY 


Is your wish list long?  If so, you may wish to consider purchasing the Starter Kit for $135, the excellent thing is that you can chose $165 worth of product and pay no tax or shipping in most provinces - yes it is an excellent value :)


Click the image to purchase the Starter Kit

*****Until September 30th 2021,  Stampin' Up!® is offering an additional bundle of freebies - please see the image below - to chose your free bundle of products.   *And you will also receive a one month Paper Pumpkin kit - yes it is an excellent value :) 


Monday, September 20, 2021

Sale a-bration ends in 10 days!

 Hello and thanks for visiting!

I cannot believe it is September 20th - what has happened to September - there's only 10 days left to earn free Sale a-bration products!  My fav's, Delicate Dahlias &  Be Dazzling  Glimmer Paper - see both these products here   And, Summer Shadows Dies - I used those in the Mega Bundle Tutorial (see below)   

See all the Sale a-bration products here  

Click here to Shop Lesley's Online Store  

*****As well, I have a giant gem of inspiration available for purchase!  The Mega Bundle Tutorial - 39 separate projects using all the free Sale a-bration products.  *Please email me at lesley@stampintrix.ca  to get your bundle of creative ideas and project directions :)  Click here for the original post featuring this Mega Bundle!


Please click here to see the Sale a-bration video from Stampin' Up!®

*****Remember Sale a-bration is an excellent time to Join Stampin' Up!® by purchasing the Starter Kit. There is no commitment to sell SU products, it simply is the best dollar value, especially during SAB.    The Starter Kits offers $165 worth of products of your choice for $135, no shopping or tax in most provinces.  *Plus, during SAB chose an additional  bundle for free ( see the image below)  *And SU will also add in a Paper Pumpkin Kit free.  This excellent offer is available until September 30th 2021 *****


Click the image to purchase the Starter Kit


Please email me if you wish more information, I am always happy to talk about the company and products I love :)

Enjoy & have a super day!

Thursday, September 16, 2021

Make a Difference with Strong of Heart Stamp Set

 Hello and thanks for visiting!

Join us in making a difference!  For every Strong of Heart Stamp Set purchased Stampin' Up!® will donate $4 to support heart health.  I used this beautiful stamp set to create today's simple card featuring one ink colour  - Polished Pink!  As I was creating my mind was racing with more card ideas using this stamp set - so stay tuned -  there's more to come :)  

Also the Stampin' Up!® Day of Service is today, what is 'a day of service' you ask?  It's the day Stampin' Up!® employees support a cause they're passionate about.  This year it's heart health.  I will be sending encouragement and thank you cards to some special caregivers at a local long term care home.   Regularly Throughout the year I regularly offer Create & Donate opportunities.  If you'd like to join me to use your card making talents and give back please check out my Create & Donate page to learn more about how I give back to the community.   Please consider joining my Christmas Card Donation this coming November 2021.


Click the image to shop for the products to make this card


Today's card is simple, I used a 4 1/4 x 5 1/2 piece of Thick Basic White cardstock.  I added a *very light wash of Polished Pink with a Water Painter!  Yes you can use Thick cardstock for water colour washes.  I still advise using Watercolour Paper or Shimmery White cardstock when using a lot of water, but for a *very light wash* the Thick Basic White can handle it. 


*  To create the background specks flick the colour using the Water Painter.  ***Trix, you don't need to squeeze the reservoir to get more water, there's enough in the brush, just dab back into the colour pool on the ink pad lid.   Next add flicks from Wink of Stella, the picture above provides a close up of the subtle shimmer.

*  Stamp the brushstroke heart image from Strong Of Heart with Polished Pink ink.

*  Stamp the sentiment from - you'll never believe it - Peaceful Cabin Stamp set - yes!  I love this stamp set, it's definitely not just for Christmas.  I used Polished Pink ink on a piece of Thick Basic White that measured 3/4 x 3 1/4 and adhered it with Stampin' Dimensionals.


*****To purchase the supplies to create this card click here,  Lesley's online store


*****I love being part of a company that gives back to the community.  If you'd like to join this awesome company consider purchasing the, Starter Kit and joining the fun.  And please email me at lesley@stampintrix.ca   I'm always happy to chat about the company and products I love!


Click the image to purchase the Starter Kit


Sale a-bration is a super time to purchase the Starter Kit because Stampin' Up!® is offering additional stamp sets.  See the image below for the bundle of your choice when you join.  *1.  Chose $165 of products from either catalog and pay $135, no shipping or tax in many provinces.  *2.  Chose a bundle below.  *3.  SU will also send you a one month Paper Pumpkin Kit.  It's simply a terrific opportunity to get the supplies you want at a great value.  

***Great paper crafting value = an opportunity to add value to your life!***

Enjoy and have a super day!


Monday, September 13, 2021

Delicate Dahlias for Kylie's Demonstrator Training September Blog Hop

 Hello and thanks for visiting!

Thank you for joining us for our Stampin' Up!® Demonstrator Training Program Monthly Blog Hop! We are so happy that you could join us today for this blog hop for ideas and creative inspiration. We are a group of Stampin' Up!® Demonstrators from around the world that are taking part in training that is helping us to build a successful Stampin' Up!® business and reach some goals we have set. We really appreciate your support.

You may be starting here or have come from another blog - either way you can find the link list at the bottom of this post so that you can see every blog post and idea today.


I love using the Delicate Dahlias stamp set for background patterns!  The stamp is a 'Distinctive' photopolymer stamp which means it has texture, depth and dimension.  And you can see through it to know exactly where you're placing it.  I used generational stamping to vary the depth of colour.   Enjoy and have fun playing with different palettes of colour. 

Click here, Lesley's Online Store to shop with me and receive this card as my thank you to you in the month of September.  *Remember to use the Host Code (found on the right side bar) when your order is $60 or greater, and then I can send you a thank you gift as well.  September Host Code is HRKS43TY 


And here's the card details:

4 1/4 x 5 1/2 Thick Basic White card base  (4 1/4 x 11 folded in half portrait orientation)

4 x 4 piece of Basic White for the sentiment and leaves

Delicate Dahlias Sale a-bration stamp set Free with a $120 order,  click here to see it 

Inks: Cajun Craze, Magenta Madness & Granny Apple Green

Tasteful Labels Dies

White Bakers Twine


Assembly & Trix:

***Trix, practise stamping the dahlia on scrap paper and play with the depth of colour that comes from Cajun Craze and Magenta Madness.   Generational stamping means to stamp once, (1st generation), then again without reinking the stamp, (2nd generation), then again (third generation)

*  Stamp using Magenta Madness three times to create a base background, then add Cajun Craze twice.

*  Stamp the sentiment using Magenta Madness and die cut using the Tasteful Label circle die.

*  Stamp the dahlia leaves using Granny Apple Green and fussy cut out.

*  Adhere the leaves to the back of the label using Stampin' Seal.

*  Tie a bow with the twine and adhere to the card base with a glue dot.

*  Adhere the label to the card base with Mini Stampin' Dimensionals.


Enjoy the inspiration from this blog hop, and have a super day!


Blog links

Monday, September 6, 2021

Friendship Thanks for Kylie Bertucci's International Blog Highlights

 Hello and thanks for visiting!

Today's Thank you card for a Friend is for Kylie's International Blog Highlights Gallery and I've mixed it up a bit.  I've put the thank you on the inside of the card.   If you like my card I'd love for you to vote for me.  Please visit Kylie's Gallery for the September Highlights.  Vote by clicking on the little heart in the top right corner of my card within the gallery.  If my card is one of the winners I will join Kylie's International Blog Hop at the end of the month.  Enjoy the inspiration you're sure to find in this gallery of talented demonstrators.  Thanks so much for playing along!


I wanted to keep this card very clean and simple, black and white, like a cartoon.  When I first saw this image I thought of friends being silly together, riding double on the handle bars of bikes and racing down hills.  I created the slit in the Basic White layer, and added in the Basic Black layer to create the look of pavement, then I knew I had to add the the gingham ribbon which said racing flag to me :)  It's funny how images evoke thoughts and in turn card designs.  I am thankful everyday for my friends that ride along the road of life with me.   I hope my card has inspired you to create a thank you card for a friend - just because! 


And here's the card details:

4 1/4 x 5 1/2 Misty Moonlight card base  (4 1/4 x 11 folded in half portrait orientation)

4 x 5 1/8 Basic White cardstock (CS) layer

4 x 5 1/4 Basic Black CS layer

3/4 x 1 inch Basic Black for the banner

1/4 x 1 inch Basic White for the sentiment

4 x 5 1/4 Basic White CS for inside layer of card

2 x 2 1/2 Misty Moonlight CS for inside banner

2 1/2 x 1 1/2 Basic Black  CS for inside banner

3 x 1 1/2 Basic White CS for sentiment to be fussy cut to size

Joyful Life stamp set

Shaded Summer stamp set

Black & White Gingham Ribbon


Assembly & Trix:

*  Cut the Basic White layer using the Paper Trimmer to create and angle.

*  Adhere the 2 pieces of Basic White to the Basic Black layer to create an slight opening suggesting a road or pavement.  ***Trix, use Multipurpose Liquid Glue (glue) to slide the layer into place perfectly.  

*  Stamp the image onto the top piece of Basic White carefully lining up the wheels of the bike so it looks like the bike is riding on the road/pavement.  

*  Adhere to the card base with glue.

*  Create a banner with Paper Snips from the 3/4 x 1 inch Basic Black piece of CS.  

*  Stamp the 'friends' sentiment with Memento Black ink on the 1/4 x 1 inch piece of  Basic White CS.  ***Trix, use a post it note to cover the second line of the sentiment 'like you make life a joy'  while inking the stamp.  Then remove the post it note and stamp the 'friends' sentiment only.

*  Adhere to the black banner with glue.

*  Adhere a piece of gingham ribbon to the back of the Basic Black banner with Stampin' Seal adhesive.

*  Adhere the banner to the card base with Stampin' Dimensionals.

*  To create the inside banner:  stamp the second line of the sentiment using a post it note to cover the 'friends' word this time.  *  Stamp the 'thank you' from the Shaded Summer stamp set.  *  Fussy cut both sentiments and adhere to the Basic Black with glue, then adhere to the Misty Moonlight.  *  Adhere the gingham ribbon to the back of the banner.  *  Adhere the banner to the card with dimensionals.  


Enjoy and have a super day!


Click here, Lesley's Online Store to shop the Mini Catalogue

*****Remember when your shopping is $60 or more please use the Host Code (found on the right sidebar), and then I can send you a little thank you gift in the mail the following month.  The September Host Code is HRKS43TY


*****Until the end of September 2021 every $60 purchase earns you a free Sale a-bration product.  Click the image below to view the products available. 


Click the image to see the SAB products available


Sunday, September 5, 2021

Christmas Cards using Peaceful Prints DSP

Hello thanks so much for visiting! 

Today's card features more quick and simple cards using the Peaceful Prints Designer Series Paper (DSP) free 'til the end of September 2021 with a $60 order.  Please click here, #makeacardsendacard Sunday  to view my Facebook Live video using the Peaceful Prints DSP.  #makeacardsendacard Sunday means that if you leave me a comment or share my video I'll add you name to a draw and send the winners the card I make.  Thanks so much for joining the fun! 


And here's the card details:

4 1/4 x 5 1/2 Basic Black card base      (4 1/4 x 11 folded in half)

3 x 3 1/4 Peaceful Prints DSP red plaid

3 x 4 Basic White cardstock (CS) layer

3/4 x 4 1/4 strip pf Basic White CS

Evergreen Elegance stamp set

Ink:  Evening Evergreen & Real Red

Red Rhinestone Basic Jewels


Assembly & Trix:

*  Adhere the DSP to the card base with Multipurpose Liquid Glue (glue)

*  Stamp the pine tree using Evening Evergreen ink.

*  Stamp the sentiment in Real Red on the strip of Basic White and cut apart.

*  Adhere the 'Christmas' sentiment to the card using glue.

*  Adhere the 'Merry' using a piece of Foam Adhesive Strip.  ***Trix, cut the foam adhesive strip and align it just above the 'Christmas' sentiment on the card base, then add a bit of foam adhesive strip to the side and top of the 'Merry' sentiment.

*  Add the bling to the Christmas tree using the Red Rhinestone Basic Jewels.

*  Honestly - that's it!  simple and done!  Now go make multiples and get those Christmas card done!  **insert smiley face here**  ;) 

Enjoy the inspiration and have a super day!


Click the image below and see all the terrific Sale a-bration products available til Sept 30, 2021.  

Click the image to view the Sale a-bration products available


*****Remember to use the Host Code found on the right side of the blog when you place an order $60 or greater and then I can send you a thank you gift in the mail the following month.  the Host Code for September is HRKS43TY.


Is your wish list long?  Consider purchasing the Starter Kit!  Sale a-bration is an excellent time to purchase the Starter Kit and Join the Stampin' Up!® community.  The Starter Kit is always the best deal because you choose $165 worth of product and pay $135 with no additional tax and no shipping.  *However during SAB Stampin' Up!® is offering your choice of product bundles - that's up to an additional  $72.75, in free product!  Woohoo!.  Please see the image below and pick your additional products    To learn more please contact me at lesley@stampintrix.ca  I am always happy to talk about the company and the products I love!


Thursday, September 2, 2021

Happy Birthday with You're A Peach DSP

 Hello and thanks for visiting!

Today I'm happy to share a card that I made while on vacation.  It was a card from one of our Team STIC Make & Takes.  What's Team STIC you ask?  Only the best group of crafting sisters ever!  :)    

When you purchase the Starter Kit from Stampin' Up!® you not only get an awesome deal, you have the opportunity to be part of a super supportive community of crafters, with a passion for paper crafting.   Our team meets monthly to craft together & celebrate each other's accomplishments.  This card came from one of those meetings and I just added the sentiment from the stamp set I had with me.   

To join the fabulous Stampin' Up!® community click here, to join the fun!   Please contact me for further info, I'm always happy talk about a company and the products I love!


And here's the card details:

4 1/4 x 5 1/2 Thick Basic White card base

4 x 5 1/4 Basic White cardstock (CS) layer

3 1/4 x 4 1/4 Balmy blue CS layer

3 x 4 Balmy Blue floral DSP from the You're A Peach DSP

1 3/4 x 3 3/4 Balmy Blue coordinating DSP from the You're A Peach DSP

Scrap Balmy Blue cardstock for the flowers.  ***I'm not exactly sure which flower punch was used, I think the Strawberry Builder Punch, but you could use the Flowers & Leaves punch.  ***Remember everything came to me pre cut :)  yep were spoiled.

3/4 x 3 Basic White strip for the sentiment of you choice.   ***I used the happy Birthday sentiment from the Shaded Summer stamp set because that's the set I took on vacation with me.  Choose whichever stamp set you wish :)

Bark 3D Embossing Folder

Linen Thread & Rhinestone Basic Jewels

***The You're A Peach DSP has all the colours you need for this project.  They are conveniently listed on the back on the DSP pack.  You can change up this card easily by choosing a different pattern within the paper.


Assembly & Trix:

*  Emboss the Basic White CS layer with the Bark 3D embossing Folder.   ***Oh did I not tell you, when you're part of the team all the Team Make & Takes packets (card supplies) are pre-cut & pre-embossed and ready to assemble!  Yes we're totally spoiled!***

*  Adhere the Balmy Blue polka dot DSP layer to the embossed layer with Multipurpose Liquid Glue (glue) 

*  Wrap the Linen Thread around the Basic White layer a couple of times.  ***Trix, secure the linen thread to the back of the CS layer using Stampin' Seal adhesive.

*  Adhere the DSP to the Balmy Blue CS layer with glue and adhere to the card base with Stampin' Dimensionals.

*  Stamp the sentiment with Pear Pizzazz ink - actually I think I used Garden Green cause that's what I had with me -  yep thx to SU Colour Coordination that works!

*  Adhere the sentiment layer to the card with glue.

*  Arrange and add the flowers to overlap each other, adhere with glue.  ***Trix, before I adhered the flowers I folded them a bit - just to distress the edges a bit for a more natural look.  

*  Add the bling - Rhinestone Basic Jewels!  they're adhesive backed and awesome!


Enjoy the inspiration and have a super day!


Click the image to join the fun


Is your wish list long?  If so consider purchasing the Starter Kit - it simply is the best value for your dollar! - and join our community of paper crafters!   Choose $165 worth of product for $135, no shipping and no taxes (in most provinces)  There is no further commitment and no requirement to sell Stampin' Up!® products.  Please contact me to learn more, lesley@stampintrix.ca 


Sale a-bration time is the perfect time to purchase the Starter Kit because SU is giving you some
additional freebies.  Choose a bundle from the image above.  As well SU will give you a one month Paper Pumpkin subscription for free.  ***Enjoy building your kit and please don't hesitate to contact me lesley@stampintrix.ca 

Wednesday, September 1, 2021

Sale a-bration Mega Bundle Tutorial Now Available!

 Hello and thanks for visiting today!

I am so excited to share a project with you that I've been working on with fellow demonstrators from around the world, the Sale a-bration (SAB) Mega Bundle of Tutorials!  Woohooo   

As some of you may be aware I've been participating in a Demonstrator Training Program to build my business.  As our year of learning together comes to a close we've created a bundle of projects for you.  The SAB Mega Bundle Tutorial! 

  • Features *All* of the free Sale a-bration Products
  • It contains more than 200 pages
  • 39 separate tutorials with measurements in metric and imperial
  • Suitable for all levels of stamping - from beginner to avid crafters


How do you get your crafty hands on this giant gem of inspiration?

Contact me at lesley@stampintrix.ca and ask for the SAB Mega Bundle.  $27 Canadian. 


Click here, Lesley's Online Store to shop now and earn the free Sale a-bration products used in the SAB Mega Bundle Tutorial.

Click the image below to see all the Sale a-bration products available.

Click the image to view the SAB products


Enjoy the inspiration and have a super day!


A Little Latte Suite with Fun Patterns Embossing Folder

  Hello and thanks for visiting! I just had to share a couple more cards from my playtime with A Little Latte Suite, #163466 available March...