Friday, September 30, 2022

Warm Welcome Sneak Peek

 Hello and thanks for visiting!

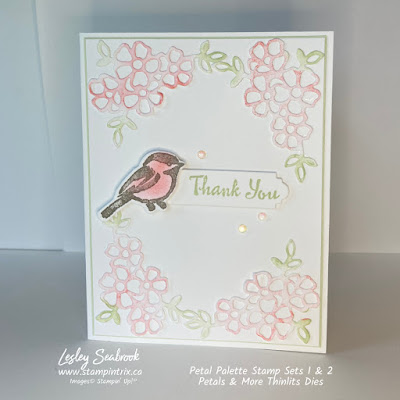
Today I create with orange in recognition of Orange Shirt Day.   Here in Canada September 30th is our 'National Day for Truth and Reconciliation' and Orange Shirt Day.  A commemorative day intended to raise awareness of the individual, family and community intergenerational impacts of residential schools.  Earlier this year, while visiting a residential school site I was deeply moved by the display of children's shoes on the steps outside of a brick residential school. The day honours the children who never returned home and Survivors of residential schools as well as their families and communities. 


Assembly & Trix

*  The only *Trix for today's card, is to sponge the embossed Brick & Mortar 3D , #149643 layer with White Craft Ink before adhering to the Pumpkin Pie card base.

*  Stamp the sentiment from Inspired Thoughts stamp set, #155536  ***Trix, mask off the extra words to reveal only  'remember'.

*  Stamp the little shoes from the Warm Welcome, #160698 stamp set - a sneak peek from the upcoming Occasions Mini Catalogue in January 2023.  Colour the shoes with Pumpkin Pie Stampin' Blends Markers.

*  The label it's clean and simple and comes from the Seasonal Labels Dies, #156299, adhered to the card base with dimensionals.  The Brushed Brass Butterflies, #158135 add the finishing touch!


***  Click here to shop and please remember to use the monthly Host Code to receive a little thank you gift from me when your order is between $60 - $135.  September Host Code GH74Q7MF

***  If your shopping cart is over $135 you have the option to click here to Join Stampin' Up!® and choose $165 worth of product but pay $135 with no tax or shipping cost.   - Or - Claim your Stampin' Rewards when your order is $200 or greater.

I purchased the Starter Kit to save money and enjoyed a discount on my purchases for 5 years until I decided to start my online business.  Please email me, lesley@stampintrix.ca if you have any questions.  I'm always happy to talk about the company and products I love!   


The Warm Welcome Bundle, #160704 is part of 

World Card Making Day October 1st, 2022

Click the image below to order this bundle today & tomorrow October 1st, 2022. 

Join the virtual event live Oct 1st 2-5 pm (MT)

 email me for the link and join the fun

lesley@stampintrix.ca 


Click the image to shop the bundle Sept 30th & Oct 1st 2022


Would you like the opportunity to order from the January 2023 Occasions Mini Catalogue before January, 2023?

You can - click here to Join Stampin' Up!® & enjoy the pre-order!

 - definitely one of the perks of being a demonstrator -

Pre-order for demonstrators begins in December

& this is the exciting part,...


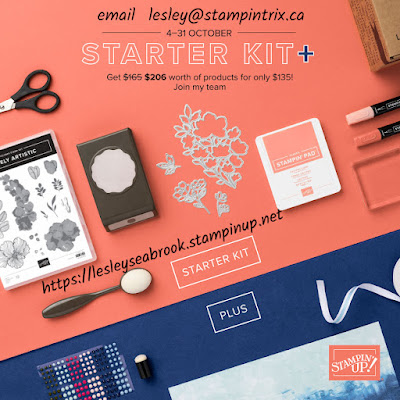
October 4th - 31st only choose $206 worth of products - pay $135 - no taxes & no shipping! 


Click the image to purchase your starter kit


Enjoy & have a super day!


Tuesday, September 27, 2022

Splendid Day Suite for #jai622

 Hello and thanks for visiting!

Today's card is for the Choose Two Challenge at Just Add Ink #622 this week.  I choose masking and foliage and added in the friend sentiment too.  Please click here @ Just Add Ink to visit the inspiration!

And thank you Just Add Ink Design Team for choosing my card last week, it was a lovely surprise, I'm really glad you liked it, thank you!  If you missed that post please click here.   

Have you ever tried masking with a die cut shape?  I love the filler stamps in the Splendid Thoughts stamp set #159688, they 'casually' fill in the outline stamps, but when I looked at the Splendid Stems Dies, #159676 I thought I'd try something a little different - please read on to see the *Trix.  


Assembly & Trix,

*  Adhere a 5 1/2 x 4 1/4 piece of Splendid Day Specialty Designer Series Paper, #159666 to a Pool Party card base.

*  Die cut a solid stem from a scrap piece of cardstock to create a decorative mask.  ***Trix, with a sponge dauber gently add Pool Party ink to the inside of the die cut image on a 3 x 4 piece of Basic White cardstock.  I chose a sponge dauber instead of a blending brush because the die cut image has delicate edges and is cut out of cardstock instead of the Stampin' Up!® decorative masks material.

*  Emboss a scrap piece of cardstock with the Painted Texture 3D Embossing Folder, #154317 and then cut out the pot from the Splendid Day Die, adhere with glue.

*  Stamp the sentiment from the Dragonfly Garden Stamp Set, #154411  ***Trix, mask off part of the sentiment with a post it note or tape, to get just the words you'd like, then adhere with dimensionals.  Embellish with the 2021 -2023 In Color™ Opal Rounds, #159185.


***  Click here to shop the supplies and please remember to use the monthly Host Code when your shopping cart is $60 - $135 to receive a little thank you gift from me.  September Host Code GH74Q7MF

***  If your shopping cart is over $135 you have the option to click here to Join Stampin' Up!®  and choose $165 worth of product but pay $135 with no tax or shipping cost.   - Or - Claim your Stampin' Rewards when your order is $200 or greater.

I purchased the Starter Kit to save money and enjoyed a discount on my purchases for 5 years until I decided to start my online business.  Please email me, lesley@stampintrix.ca if you have any questions.  I'm always happy to talk about the company and products I love! 


Click here to watch my YouTube video about the Masking Technique I created a while back.  I used the dies cuts from the Summer Shadows die shapes, #156618.   


The Weekly Deals end Sept. 28th!


Click the image to shop the deals :)


Enjoy and have a super day!


Saturday, September 24, 2022

Adventurous Journey for #hss398 & #stampinfancyfriday

 Hello and thanks for visiting!

I have two cards for you today, inspired by the Sketch Challenge at Hand Stamped Sentiments.  Please click on the #hss398 image below to visit their blog and enjoy the inspiration!  *And Wow!, thanks so very much Hand Stamped Sentiments Design Team for choosing my card for Inspiration challenge #397, you made my day!  Please click here to visit that blog post.

The first card is a SIP card, use only Stamps, Ink & Paper, (well I added a couple of gems too just 'cause - ha) and the second is a Stepped Up version using the He's The Man Specialty Designer Series Paper, #159068.  I remember when I first started stamping I bought one pack of cardstock with my favourite colours, a pack of white cardstock and one ink pad.  So in the spirit of First Time Stampers or those that are building their collection, I chose to create a SIP card and then also show how it can be Stepped Up, with an additional pack of DSP.


Assembly & Trix

SIP card,

*  Use Tahitian Tide to create a 7 x 8 1/2 slimline card, (score at 3 1/2) with a 3 1/4 x 8 1/4 distressed layer, ***Trix, simply rough up the edges with a pair of scissors.

*  Stamp the kayak and rings using the Adventurous Journey Stamp Set, #159103 with Tahitian Tide Ink on the Tahitian Tide layer as per the sketch.

*  Stamp a second kayak with Bermuda Bay ink on Tahitian Tide cardstock, for a darker, yet slightly monochromatic look.  ***Trix, use a Water Painter, #151298 to add a tiny bit of Bermuda Bay ink to the Kayak, (taking care to not squeeze out too much water and smear the stamped image), then fussy cut out. 

*  Adhere the second kayak with dimensionals over the first to create dimension.

*  Stamp happy birthday with Tahitian Tide ink on Basic White cardstock and fussy cut out, adhere with dimensionals. 


Stepped Up version,

*  I switched up the slimline slightly by changing the measurements to a 7 x 7 square, score at 3 1/2.  Adhere the 3 1/4 x 6 3/4 piece of He's the Man DSP, #159068 and distress the edges with scissors, then adhere to the card base with glue.  

*  This Specialty DSP pack has a page of 'elements' - I used the ripped edge piece as the anchoring layer for the kayak.  Stamp the rings from the stamp set with Soft Succulent ink then adhere with glue.

*  Stamp the kayak with Soft Succulent Ink on a scrap piece of Basic White cardstock.  Colour with Soft Succulent Stampin' Blends Markers, fussy cut out, and adhere with dimensionals.

*  Stamp the sentiment with Early Espresso ink, fussy cut out and adhere with dimensionals.  Embellish with Rustic Metallic Dots, #159082  


I've also added my card to the Stampin' Fancy Friday September Challenge - Boys to Men.  Click here to visit the gallery on Instagram & visit Lesley's StampinTrix on Instagram here.

My son loved to kayak when he was younger, he's now an Outdoor Adventure Educator.  I'm so grateful we were able to provide him with opportunities that shaped his future!


***  Click here to shop and please remember to use the monthly Host Code when your order is between $60 - $135 to receive a little thank you gift from me.  September Host Code, GH74Q7MF

***  If your shopping cart is over $135 you have the option to click here to Join Stampin' Up!® and choose $165 worth of product but pay $135 with no tax or shipping cost.   - Or - Claim your Stampin' Rewards when your order is $200 or greater.

I purchased the Starter Kit to save money and enjoyed a discount on my purchases for 5 years until I decided to start my online business.  Please email me, lesley@stampintrix.ca if you have any questions.  I'm always happy to talk about the company and products I love! 


Please click on the image to visit the Hand Stamped Sentiment Sketch Challenge

Click the image to visit #hss398


Remember, this is the last week of 'Weekly Deals'

Click the image to see the deals this week


Click the image to shop the deals!


Enjoy & have a super day!

Thursday, September 22, 2022

New Weekly Deals Posted Today

 Hello and thanks for visiting!

It's Thursday!  that means new deals are available (one week only)

***  Click here to check out the deals this week! 

If you love embellishments and shimmery paper you'll love the deals this week.  I have a few favourites, the copper foil sheets, absolutely perfect for Autumn Themed cards, Festive Foil Specialty DSP, Gilded Leafing, Matte Black Dots, ribbons, pearls and more.


This card is featured on the My Projects page of my online store, it uses the Festive Foil Specialty DSP, #159563 as the band around the box.  The Lights Aglow Specialty DSP, #159535 is an awesome little 6 x 6 paper pack, perfect for quick and easy Christmas cards. 


Click the image to shop the supplies to make this card


Another favourite is the Gilded Leafing, 154560.

  Here's a simple little *Trix to 

 Create a Gilded Leafing background 


Click the image to watch my Instagram Reel


Click here to visit Lesley's StampinTrix on Instagram 


This is the last week for the Weekly Deals Promotion

September 22 - 28 only


Click the image to shop the deals!


***  Click here if you're interested in adding these deals to your Starter Kit - simply the best value for the dollar.  Please email me if you have any questions

 lesley@stampintrix.ca

**  If your shopping cart is over $135 you have the option to Join Stampin' Up!® and choose $165 worth of product but pay $135 with no tax or shipping cost.   - Or - Claim your Stampin' Rewards when your order is $200 or greater.


***  Click here to shop and please remember to use the monthly Host Code when your shopping cart is between $60 - $135 to receive a little thank you gift from me.  September Host Code GH74Q7MF


Enjoy and have a super day!

Tuesday, September 20, 2022

Whimsical Woodland for #gdp361 & #jai621 Challenges

 Hello and thanks for visiting!

Today's Christmas card is inspired by the #361 Colour Challenge @ Global Design Project - use Parakeet Party, Shaded Spruce & Flirty Flamingo, perfect for a whimsical Christmas card I think.  The Design layout is inspired by the #621 Sketch Challenge @ Just Add Ink, a perfect sketch for a cluster of trees.  Please click the images below to visit the blogs and enjoy the inspiration!


Assembly & Trix

*  Emboss a 4 x 5 1/4 piece of Flirty Flamingo with the Whimsical Woodland 3D Embossing Folder, #159831 then blend on a bit of White Craft Stampin' Ink, #147277 with a blending brush before adhering it to a 4 1/4 x 5 1/2 Flirty Flamingo card base.

*  Die cut the trees using Parakeet Party & Shaded Spruce cardstock.   (I used the Sale-A-Bration Tree Lot dies)  the ***Trix, is to blend on a bit of Shaded Spruce ink to the Parakeet Party trees for some added depth & dimension before adhering the the card base.  

***Trix, use different adhesives and only add the adhesive to the card base so the trees can overlap each other without being bulky on the card.  Adhere the Shaded Spruce tree with glue, use rolled Glue Dots to adhere the Parakeet Party tree, then pop up the last tree with dimensionals.     

***Trix, instead of creating a bow, loop the Parakeet Party Bakers Twine, #159195 together and secure with a glue dot.  Stamp the sentiment from the Brightest Glow Stamp Set, #159863 with Parakeet Party ink and double stack the mini dimensionals to float the sentiment over the textured trees.  Embellish with Festive Pearls, #159963 & 2021 - 2023 In Color™ Opal Rounds, #159185. 


***  Click here to shop and please remember to use the monthly Host Code when your shopping cart is between $60 - $135 to receive a little thank you gift from me.  September Host Code GH74Q7MF

***  If your shopping cart is over $135 you have the option to click here & Join Stampin' Up!® and choose $165 worth of product but pay $135 with no tax or shipping cost.   - Or - Claim your Stampin' Rewards when your order is $200 or greater.

I purchased the Starter Kit to save money and enjoyed a discount on my purchases for 5 years until I decided to start my online business.  Please email me, lesley@stampintrix.ca if you have any questions.  I'm always happy to talk about the company and products I love!  


#gdp361 Color Challenge

Click the image to visit #gdp361


#jai621 Sketch Challenge

Click the image to visit #jai621


September Weekly Deals

Click the image to see the deals this week


Click the image to see the deals


Perfect Partners 

Click here to shop for the Perfect Partners September 2022 only! 


Enjoy & have a super day!  


Sunday, September 18, 2022

Soft Seedlings for 3 Challenges

 Hello and thanks for visiting!

Isn't fall a terrific time of year, there is inspiration everywhere in nature!  Today's card is inspired by 3 challenges.  The #gdp360 CASE the Designer Challenge , I flipped Wilma's design layout and put the band of DSP at the top.  The Hand Stamped Sentiments Challenge #397  inspires us with a beautiful fall photo this week, and living in Canada I had to choose the Maple Leaf from the Soft Seedlings Stamp Set of course.  The Paper Players Challenge #609 Clean-and-Simple Challenge inspires us with Scarecrows and/or Leaves - oh I wish I had a scarecrow, that would be fun! alas it'll be leaves for this one :)  

Please click on the hyperlinks above to visit the challenges.


Assembly & Trix

*  Adhere a 1/2 inch x 4 inch piece of Pretty Prints DSP, #159245 to a 4 x 4 1/2 piece of Basic White cardstock embossed with the Timeworn Type 3D Embossing Folder, #156505 then ***Trix, scrunch it up to create more texture, before adhering it to a 4 1/4 x 5 1/2 Thick Basic White card base.  Use a Wink Of Stella Glitter Brush®, #141897 to flick a bit of sparkle on the card base.

***Trix, use Sponge Daubers, #133773 to add ink to the stamp.  I used Old Olive, Crushed Curry, Calypso Coral & Cajun Craze ink, then fussy cut it out.  Twine the Linen Thread, #104199 around the stem and tie a bow.

*  Stamp the sentiment with Calypso Coral ink and adhere to the card base with glue before adhering the leaf cluster with dimensionals.  Embellish with Festive Pearls, #159963.


***  Click here shop and please remember to use the monthly Host Code when your order is $60 - $135 to receive a little thank you gift from me.  September Host Code, GH74Q7MF

***  If your shopping cart is over $135 you have the option to click here & Join Stampin' Up!® and choose $165 worth of product but pay $135 with no tax or shipping cost.   - Or - Claim your Stampin' Rewards when your order is $200 or greater.

I purchased the Starter Kit to save money and enjoyed a discount on my purchases for 5 years until I decided to start my online business.  Please email me, lesley@stampintrix.ca if you have any questions.  I'm always happy to talk about the company and products I love!   


Have your heard about the September Weekly Deals?

Click the image to visit the specials this week


Click the image to shop the discounts


Enjoy & have a super day!


Saturday, September 17, 2022

Bewitching Bundle & Paper Pumpkin for #gdp360

 Hello and thanks for visiting!

Today's card is inspired by the CASE the Designer Challenge over @ Global Design Project #360 this week.  I've used the Bewitching Bundle, #159857 with a fabulous plaid from the September Paper Pumpkin Kit called Spooky Treats.  The supplies create treat boxes, but I wanted to make a Halloween birthday card for a friend, so I used a bit of plaid paper, and yes I forgot to bring a birthday stamp with me, so it's a Happy Halloween card.  Please click on my card or the hyperlink above to visit the challenge.


Please click my card to visit the challenge


Assembly & Trix

There's a few things that I'm CASEing from Wilma's card, the band of DSP at the base of the card, I like the size of the cardstock layer, and the focal image near the bottom with a textured background.

*  Adhere a 1 x 4 inch piece of plaid DSP to the base of the 4 x 4 1/2 layer of Fresh Freesia.  I love this plaid!  Simply cut a piece from the supplies in the kit. 

***Trix, If you find yourself without your SCEM & embossing folder, try scrunching the cardstock layer to create a bit of texture and interest, then adhere it to the Fresh Freesia card base.  For an extra bit of visual interest flick Wink Of Stella® Glitter on the card front.

*  Stamp the witches boots with Memento Black ink and colour with Orchid Oasis ink and Wink Of Stella®  ***Trix, dab the ink spot from this months kit onto a clear block and mix in a bit of Glitter then paint it on the witches boots.  Adhere to the card base with glue.

*  Punch the witches hat from the 2022 - 2024 In Color 6 x 6 Glimmer Paper Pack, #159246 (Orchid Oasis) and adhere with dimensionals.

*  Stamp the sentiment, fussy cut out and adhere with dimensionals, then embellish with the stars from the Paper Pumpkin Kit.


***  Click here to shop and please remember to use the monthly Host Code when your shopping cart is between $60 - $135 to receive a little thank you gift from me.  September Host Code GH74Q7MF 

***  If your shopping cart is over $135 you have the option click here to Join Stampin' Up!®  and choose $165 worth of product but pay $135 with no tax or shipping cost.   - Or - Claim your Stampin' Rewards when your order is $200 or greater.

I purchased the Starter Kit to save money and enjoyed a discount on my purchases for 5 years until I decided to start my online business.  Please email me, lesley@stampintrix.ca if you have any questions.  I'm always happy to talk about the company and products I love!   


Have you heard about the Weekly Deals?

Click the image to visit the specials this week


Click the image to see the discounts this week


Click here to subscribe to Paper Pumpkin 


Click here to visit Lesley's Stampin' Trix on Instagram


Enjoy and have a super day!


Thursday, September 15, 2022

Brightest Glow for #tgifc

 Hello and thanks for visiting!

Today's card is inspired by the #tgifc385 Sketch Challenge.  Please click on either my card or the #tgifc385 image to visit their blog post and enjoy the inspiration.  

I decided to flip the sketch vertically, narrow the rectangle shape on the right and use a snowflake as the layer with a cut out shape.  I really love this paper and I think you could create a set of Christmas cards from one pack of paper by interpreting the sketch in various ways.  So stay tuned, I have a horizontal fun fold version in the works for ya.


Click the image to visit the #tgifc385 challenge


Assembly & Trix

*  Adhere three strips of Lights Aglow 6 x 6 Specialty Designer Series Paper, #159535.  ***Trix to max out this great paper, cut 3 pieces at 3 inches, 1/2 an inch and 1 inch by 5 3/8.

*  Adhere a Wonderful Snowflake, #156340 with a dimensional - and yes the regular size dimensional fits perfectly in the centre.

*  Stamp the sentiment from the Brightest Glow Stamp Set, #159542 with Evening Evergreen ink and fussy cut out, then adhere with Mini Stampin' Dimensionals.

*  Embellish with Festive Pearls, #159963.


***  Click here to shop the supplies and please remember to use the monthly Host Code when your order is between $60 - $135 to receive a little thank you gift from me.  September Host Code GH74Q7MF

***  If your shopping cart is over $135 you have the option to click here and Join Stampin' Up!® and choose $165 worth of product but pay $135 with no tax or shipping cost.   - Or - Claim your Stampin' Rewards when your order is $200 or greater.

I purchased the Starter Kit to save money and enjoyed a discount on my purchases for 5 years until I decided to start my online business.  Please email me, lesley@stampintrix.ca if you have any questions.  I'm always happy to talk about the company and products I love! 


Please click on the image to visit the #tgifc385 blog

Click the image to visit the #tgifc385 challenge


24 Hour Sale today only!

15% off on the 15th


Click the image to shop the sale on September 15th 2022 only


*Click here to see the PDF list of stamp sets included in the sale - almost all sets in the Annual Catalogue!  


Enjoy and have a super day!

Wednesday, September 14, 2022

Surprise 24 Hour Sale Starts Tomorrow

 Hello and thanks for visiting!

Woohoo the Stampin' Up!® 24 Hour Sale starts tomorrow, September 15th.  Almost all stamps in the Annual Catalogue are 15% off.  Click here to see the PDF list of stamps.  This is a one day only sale and stamps are available while supplies last.


Click the image to shop my online store


***  Click here to shop and please remember to use the monthly Host Code when your shopping cart is between $60 - $135 to receive a little thank you gift from me.  September Host Code is GH74Q7MF 


Here are a few faves from my Wish List


Click the image to see Sunny Splash #158784 in my online store


Click the image to see Cottage Rose, #159040 in my online store


Tuesday, September 13, 2022

Petal Palette for #rrcb191

 Hello and thanks for visiting!

Today's card is for the Retro Rubber Challenge Blog #191 Sketch Challenge, I'm so excited to be the Guest Designer for this challenge!  Thanks again design team for choosing my card as a top pick from challenge #186.  If you'd like to see that card please *click here   Please click either my card or the #rrcb191 image to visit this weeks challenge on the blog and enjoy the inspiration.  

I chose the Petal Palette 1 & Petal Palette 2 Stamp Sets with coordinating Petals & More Thinlits™ Dies.  This pretty little stamp set came in two parts, images & sentiments. I don't know the age of these stamps but certainly pre 2020 - when we still had the Big Shot and called our little dies 'Thinlits' :) 


Please click my card to visit #rrcb 


Assembly & Trix

*  Die cut the flowers from Basic White cardstock then sponge on Flirty Flamingo and Soft Sea Foam ink using Sponge Daubers, #133773.  I love the soft, irregular colour effect sponge daubers can provide on a small little area.  ***Trix, carefully dab Flirty Flamingo on the die cut shape, (the die cut is delicate and can tear).  Use a scrap piece of paper to swirl & dab the colour on, dabbing off as needed to create soft and varied colour.  Use a new dauber to sponge Soft Sea Foam ink on the leaves, *use a new scrap of paper too so as to not pick up previous colour. 

***Trix, dab tiny bits of glue to the die cut shapes and allow to die a bit before adhering to the 4 x 5 1/4 Basic White layer, so the glue doesn't smoosh out.  Then adhere the layer to a piece of Soft Sea Foam cardstock a smidge bigger before adhering to the Thick Basic White card base.  

*  Stamp the little bird with Gray Granite ink, dab on Flirty Flamingo ink then die cut out.

*  Stamp the 'thank you' sentiment with Soft Sea Foam ink and die cut with the label in the set.

*  Adhere the bird & the label with dimensionals then embellish with Iridescent Rhinestones Basic Jewels, #158130.


***  Click here to shop and please remember to use the monthly Host Code when your shopping cart is between $60 - $135 to receive a little thank you gift from me.  September Host Code GH74Q7MF.

 ***  If your shopping cart is over $135 you have the option to Join Stampin' Up!®  and choose $165 worth of product but pay $135 with no tax or shipping cost.   - Or - Claim your Stampin' Rewards when your order is $200 or greater.

I purchased the Starter Kit to save money and enjoyed a discount on my purchases for 5 years until I decided to start my online business.  Please email me, lesley@stampintrix.ca if you have any questions.  I'm always happy to talk about the company and products I love!  


Please click the image to visit the #rrcb191 Challenge

Click the image to visit the blog


Enjoy & have a super day!   

Monday, September 12, 2022

Demonstrator Training Blog Hop September 2022

 Hello and thanks for visiting!

Welcome to the Demonstrator Training Program Monthly Blog Hop! We are so happy that you could join us today for this blog hop for ideas and creative inspiration. We are a group of Stampin' Up!® Demonstrators from around the world that are taking part in training that is helping us to build a successful Stampin' Up!® business and reach some goals we have set. We really appreciate your support.


You may be starting here or have come from another blog - either way you can find the link list at the bottom of this post so that you can see every blog post and idea today.


Assembly & Trix

*  Who finds colouring therapeutic?  Hands up - Me :)   Chose your favourite colouring tool, Stampin' Blends Markers, Watercolour Crayons, Chalks, whatever, have fun and colour the paper.  Create a bunch of cards with this awesome DSP, just mix up the cardstock colour and DSP pattern, there's lots to chose from in this 12 x 12 pack.

*  Colour a couple of flowers with Polished Pink Stampin' Blends Markers then adhere the 3 1/4 x 5 1/2 piece of Perfectly Penciled DSP to a piece of Basic Black cardstock a smidge bigger.

*  Emboss a piece a 3/4 x 4 1/4 piece of Basic Black cardstock with the Stipes & Splatters 3D Embossing Folder, #157980 and adhere to the card base with dimensionals.

*  Stamp the 'thanks' from the Artistically Inked Stamp Set #154542 with Memento Black Ink and fussy cut out, then adhere to the band with glue and embellish with Classic Matte Dots, #158146.


Thanks so much for stopping by today!

As mentioned at the top, this is a blog hop so make sure you 'hop' around to all the amazing projects on this hop! Click on the links below to visit them.

Blog Hop Links

style="font-family: Cantarell;">

***  Click here to shop the supplies to create this card, and please remember to use the monthly Host Code when your shopping cart is between $60 - $135 to receive a little thanks you gift from me.  September Host Code GH74Q7MF

***  If your shopping cart is over $135 you have the option to click here to Join Stampin' Up!® and choose $165 worth of product but pay $135 with no tax or shipping cost.   - Or - Claim your Stampin' Rewards when your order is $200 or greater.

I purchased the Starter Kit to save money and enjoyed a discount on my purchases for 5 years until I decided to start my online business.  Please email me, lesley@stampintrix.ca if you have any questions.  I'm always happy to talk about the company and products I love!   


Enjoy and have a super day!


Friday, September 9, 2022

Half Full Stamp Set for #rrcb190


Hello and thanks for visiting!

Today's card is inspired by Retro Rubber Challenge #190  Tag, You're It! Please click on the hyperlink or my card to visit the blog.  Tags are a super fun way to create focus on a card or alone as the card on a wine bottle ;)

I remember when I bought this set I thought it was great because it had a built in 'tag' shape as a stamp that I could fussy cut out, and a 'bunch' of great sentiments, perfect for a variety of occasions.  Since I live in wine country I need to give away bottles of wines when I visit friends right?  ;) 

The retired stamp set is called 'Half Full' #144999, a set of 10 red rubber stamps with a not so sticky clear mount label. 


Click my card to visit #rrcb190


Assembly & Trix

*  Adhere a 1 1/4 x 5 1/2 piece of Lights Aglow 6 x 6 DSP, #159535 to a piece of Cherry cobbler cardstock with glue, then die cut with a circle - I used the Layering Circles Dies, #151770 - a perfect die set with a variety of sizes - for different size wine bottles of course ;)   Then score at 2 1/8 to fit the straight necked wine bottle.  

*  Stamp the sentiment label with Cherry Cobbler ink.  ***Trix, blend the colour a bit using a Blender Pen, #102845.  Add a touch of Gorgeous Grape & Mossy Meadow ink to the bunch of grapes, then highlight with Wink of Stella®, #141897 for a bit of clear glitter glitz.  Fussy cut out and adhere to the wine bottle tag with dimensionals.

*  Create a bow with Linen Thread, #104199 & Simply Elegant Trim, #155766 and adhere with a glue dot.  

*  Chose the other sentiments, stamp and tie on the bottle with the same trim.  


**  To create a simple card, distress a 4 1/8 x 4 1/8 piece of Lights Aglow DSP with scissors on the edge and adhere to a Cherry Cobble card base.  ***Trix, stamp a second label with Cherry Cobbler ink, fussy cut out, flip it over and adhere it to the Basic White label with glue.  


***  Click here to shop and please remember to use the monthly Host Code when your shopping cart is between $60 - $135 to receive a little thank you gift from me.  September Host Code, GH74Q7MF. 

***  If your shopping cart is over $135 you have the option to Join Stampin' Up!®Join Stampin' Up!® and choose $165 worth of product but pay $135 with no tax or shipping cost.   - Or - Claim your Stampin' Rewards when your order is $200 or greater.

I purchased the Starter Kit to save money and enjoyed a discount on my purchases for 5 years until I decided to start my online business.  Please email me, lesley@stampintrix.ca if you have any questions.  I'm always happy to talk about the company and products I love!   


Enjoy & have a super day!     


Sunday, September 4, 2022

3 Fishes 3 Wishes

 Hello and thanks for visiting!

Today I have 3 cards for you, inspired by the simple design @ Global Design Project using the stamp set & punch bundle called A Fish & A Wish #159001.  Please click on the link above to visit the #GDP358 Sketch Challenge and then go make a quick and simple card to share with someone special.  

The first card is a SIP card (Stamps Ink & Paper), the second is a stepped up card using the punch with the stamp set, and the last one is my entry to #GDP358.  You can also see it here on Lesley's Stampin Trix on Instagram    


*  This SIP card uses Bermuda Bay and Coastal Cabana Ink, stamp off to create colour variation for a quick and simple single layer card using just the stamp set, #158993.


*  Step It Up by adding a layer of Pool Party behind the Basic White layer.  The Fish & sentiments are stamped with Coastal Cabana ink.  Punch out one fish with the Fish Builder Punch #159000 and adhere with dimensionals.  Embellish with the 2021 - 2023 In Color™ Opal Rounds, #159185   

***  Click here to shop  the stamp sat and punch together and save 10%, A fish & A Wish Bundle #159001


Assembly & Trix

*  The final card uses a the retired embossing folder called Seaside Textured Impressions Embossing Folder for a bit of dimension.  I love the coordination Stampin' Up!® provides!  A couple years later I'm able to coordinate a new stamp set with a retired embossing folder, wonderful!

*  The embossed 5 3/8 x 4 1/8 Bermuda Bay layer is brushed with a bit of Bermuda Bay Ink using Blending Brushes, #153611 for a bit of colour variation.

*  The 4 7/8 x 3 5/8 Coastal Cabana layer frames the 4 3/4 x 3 1/2 Basic White stamped layer but here's the ***Trix, lay the Basic White layer on the embossed layer to stamp the wave image and line up the wave pattern with the embossed wave pattern before gluing together.

*  Stamp the fish on scrap Basic White and punch out, then adhere with dimensionals.  Embellish with Iridescent Rhinestones Basic Jewels, #158130


Please click the image to visit #GDP358

Click the image to visit #GDP 358


***  Click here to shop the supplies to create these cards.  And please remember to use the monthly Host Code when your shopping cart is between  $60 - $135 to receive a little thank you gift from me.  September Host Code GH74Q7MF

***  If your shopping cart is over $135 you have the option to  Join Stampin' Up!®  and choose $165 worth of product but pay $135 with no tax or shipping cost.   - Or - Claim your Stampin' Rewards when your order is $200 or greater.

I purchased the Starter Kit to save money and enjoyed a discount on my purchases for 5 years until I decided to start my online business.  Please email me, lesley@stampintrix.ca if you have any questions.  I'm always happy to talk about the company and products I love! 


Enjoy & have a super day!  

A Little Latte Suite with Fun Patterns Embossing Folder

  Hello and thanks for visiting! I just had to share a couple more cards from my playtime with A Little Latte Suite, #163466 available March...