
Hello and thanks for visiting!
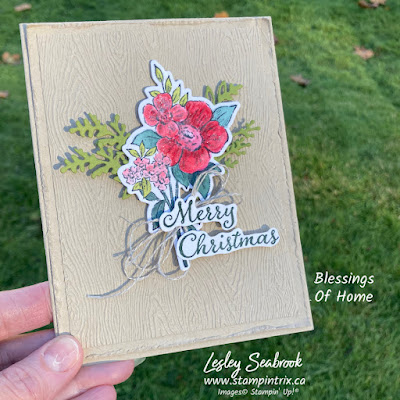
The Blessings of Home Stamp Set and matching dies are coming in the 2022 January - June Mini Catalogue. I received it early as part of the #onstageathome event this past weekend. I love a bouquet of fresh flowers at anytime of the year, especially with some Christmas greenery tucked in, so I stamped the beautiful bouquet from Blessing Of Home and coloured it with reds and greens then added a bit of glimmer to add to the Christmas feel. The Merry Christmas is from Evergreen Elegance stamp set in the Annual Catalogue.
My card was inspired by Australian demonstrator Maheswari Rajaguru. Here blog is called 'My Stamp Garden'. I love how Maheswari layers her cards, the card in particular that inspired todays card has a distressed middle layer. Please see her card in the International Highlights Gallery we both enter each month. The voting is now closed for November but check back here December 6, at 4 pm for the December Highlights Gallery! Here's the link to see Maheswari's card #8
My card uses the new Blessings of Home stamp set & the Merry Christmas greeting from the Evergreen Elegance stamp set in the Annual Catalogue.
And here's the card details:
4 1/4 x 5 1/2 Crumb cake card base (4 1/4 x 11 folded in half portrait orientation)
4 1/8 x 5 3/8 Crumb Cake cardstock (CS) layer Item #120953
3 3/4 x 5 Crumb Cake CS layer
4 x 3 Shimmery White CS Item #101910
1 x 4 scrap of Shimmery White CS for sentiment layer
Scraps of Old Olive CS for greenery Item #100702
Timber 3D Embossing Folder Item#156406
Blessings Of Home stamp set *coming January 2022
Evergreen Elegance stamp set Item #153313
Memento Black Ink Item #132708
Real Red Ink Item #147084
Blender Pens Item #102845
Stampin' Blends Markers: Soft Succulent, #155521 Evening Evergreen, #15517 Old Olive, #154892
Wink of Stella Glitter Brush Item #141897
Linen Thread Item #104199
Click here to shop Lesley's Online Store
The Stampin' Up!® Seasonal Sale starts today click here to shop the sale ***Please use Host Code G6FBHW3E when your shopping cart is $60 or greater and then I'll send you a thankyou gift in the mail with your thank you card the following month :) Happy Sale Shopping.
Assembly & Trix:
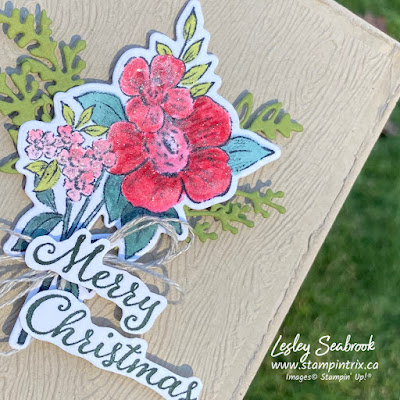
***Confession, initially I used blender pens to pick up ink and vary the intensity of colour on the flowers, as I worked I wasn't sure I liked my colouring, so I moved to blends for the leaves - ***Happy Mistake, I knew I wanted to try the technique we learned at #onstageathome, using Wink of Stella to pick up ink colours right from the ink pad, so that's what I did with the smaller flowers, the result is sparkly flowers, so I continued to add Real Red ink and Wink of Stella to the large flower.
* Distress the first layer of Crumb Cake CS with an old pair of scissors along the edges to rough them up, wrinkle them a bit with your fingers to break up the paper fibres. Then adhere to the card base with Multipurpose Liquid Glue, (glue).
* Emboss the smaller Crumb Cake layer with the Timber Embossing folder and adhere to the card layer with glue.
* Stamp the flower bouquet with Memento Black ink on the Shimmery White CS and colour using the Real Red ink pad and Wink of Stella for the flowers. ***Trix, to vary the depth of color on the flower petals, colour first by picking up colour from the Real Red ink pad lid with a blender pen. Then follow with Wink Of Stella and Real Red ink, take care to pick up a very little bit of colour at a time, and wipe off the lid after using.
* Colour the leaves with a combination of blends as listed above.
* Die cut the coloured image, and extra greenery using the scraps of Old Olive CS.
* Adhere the greenery to the back of the bouquet image using glue.
* Adhere to the card base with Stampin' Dimensionals (dimensionals).
* Stamp the greeting using Evening Evergreen Ink and fussy cut out.
* Adhere the Linen Thread to the back of the greeting with a Glue Dot.
* Adhere the greeting to the card. ***Trix, stack two mini dimensionals on top of each other and adhere to the card, allow the 'M' and the 'C' to simple lay on the bouquet.
The #onstageathome virtual celebration event was fabulous! Three days filled with inspiration and community! Would you like to be part of a vibrant community of paper crafters? If so I invite you to take advantage of the Special Offer on now til Nov 30th.
Start With Savings
Starter Kit Promotion
Available 'til Nov. 30th 2021
* The Stampin' Up!® Starter Kit is being discounted to $100 (normally $135)
* Choose up to $165 in Stampin' Up!® products of your choice
***Yes that is a $65 shopping spree!
 |
| Please click the image to Join Lesley's Team |
To order the $100 Starter Kit and Join my Stampin Trixsters Team, please click here
For more information, please email me at lesley@stampintrix.ca
I'm always happy to talk about the products and the company I love!
Questions?
Do I have to teach classes or demonstrate the product - No, you are simply purchasing a kit of supplies. I welcome all hobby enthusiasts to our little community. Choose the supplies you want in your kit and enjoy the ongoing perks Stampin' Up!® offers, or choose to move your hobby to a business, it's totally up to you.
Will I receive ongoing discounts? - Yes 20% future orders.
What's the catch? - I've heard there are quarterly minimums - what does that mean? Stampin' Up!® demonstrators receive 20 % off their purchases. To be eligible for the discount you need to spend $300 every 3 months. - However - this Special Promotion is extra special because it's November - part of the way through the final 'Quarter' of the year. That means you don't need to spend your qualifying $300 until April 2022.
Enjoy and have a super day!


Beautiful card Lesley x
ReplyDeleteWow thx so much Mo - terrific of you to stop by- thank you! :)
Delete