Monday, November 15, 2021

Demonstrator Training Program November Blog Hop

 Hello and thanks for visiting!

Thank you for joining us for our Stampin' Up!® Demonstrator Training Program Monthly Blog Hop! We are so happy that you could join us today for this blog hop for ideas and creative inspiration. We are a group of Stampin' Up!® Demonstrators from around the world that are taking part in training that is helping us to build a successful Stampin' Up!® business and reach some goals we have set. We really appreciate your support.

You may be starting here or have come from another blog - either way you can find the link list at the bottom of this post so that you can see every blog post and idea today.


The Thank You card I've created for my customers this month is called a 'Gate Fold' card.    I hope it inspires you to use your beautiful DSP and create a pile of cards this season.  The DSP is cut in 3x4 pieces - you can create 12 cards from 1 sheet of DSP  - What?!?! - yes really - it is a super convenient way to maximize your DSP.  Personally I love the big border of cardstock, it creates a bold focal image and shows how perfectly the DSP and cardstock coordinates, and it's a cost effective way to create multiple cards.  Enjoy!  

Oh and I almost forgot Cardstock is on sale starting tomorrow - woohoo - the Seasonal Sale starts Nov. 16th -18th  Click here to shop the sale   


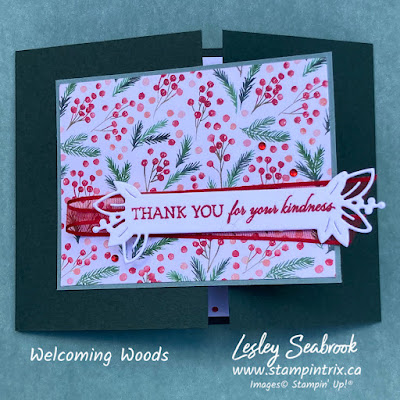
And here's the card details:

4 1/4 x 11 Evening Evergreen cardstock (CS) 

3 1/8 x 4 1/8 Soft Succulent CS layer

3 x 4 Painted Christmas DSP

4 1/2 x 1 1/2 Basic White CS for the label

4 x 5 1/4 Basic White CS for inside layer

Welcoming Woods stamp set

Painted Christmas stamp set

Real Red Sheer Ribbon

Eden Dies

Real Red Ink

Red Rhinestone Basic Jewels


Assembly & Trix:

*  Score the Evening Evergreen card base at 3 and 8 1/2 

*  Adhere the DSP to the Soft Succulent layer with Multipurpose Liquid glue (glue)

*  Adhere one side of Soft Succulent & DSP layer to the card base.

*  Die cut the label from the Eden Dies using Basic White CS then stamp the greeting using Real Red ink.  ***Trix, usually I recommend stamping first and then die cutting, however with a longer greeting it's important to cut first and then stamp to line up the greeting perfectly.  Measure 1st by laying your stamp on the die to see if it fits.  

*  Adhere the Real Red Sheer Ribbon to the back of the label with glue and set aside to dry, then adhere to card base with Stampin' Dimensionals.

*  Embellish with Red Rhinestone Basic Jewels.

*  Decorate the inside of the card with the Holly berries from the Painted Christmas stamp set using Real Red ink.


Thanks so much for stopping by today!

As mentioned at the top, this is a blog hop so make sure you 'hop' around to all the amazing projects on this hop! Click on the links below to visit them.

Blog Hop Links

style="font-family: Cantarell;">


Seasonal Sale

November 16-18 

Please click the image to shop my online store


Click here to shop Lesley's Online Store


*****Please remember to use the Host Code G6FBHW3E when your shopping cart is $60 or greater and then I can send you a little thank you gift in the mail with this customer thank you card in the month of December*****


Enjoy & have a super day!


Friday, November 12, 2021

In The Moment at #OnstageAtHome

 Hello and thanks for visiting today!

Currently I'm enjoying #OnStage, and it is fabulous!  Onstage is like an annual convention for us Stampin' Up!® demonstrators, full of inspiration and fun!   I will be sharing cards using new products from the January - June 2022 Mini Catalogue in the next few weeks, so check back and pull out your wish list!  :)

Here's a sneak peek from the January - June 2022 Mini Catalogue.  


I was inspired by Chelsey Christensen's presentation at #OnStage Friday and I had to give it a try.  Yes, I used a Basic White Note Card and blended the background.

***Can you guess which 3 colours I used in the sky?  Please leave me a comment at the bottom of this post and I'll answer on Sunday.  As well I'll share the technique Chelsey showed us in her presentation.  Thx for playing along :)    


Is your wish list long?  If so, perhaps you'd consider turning your 'Wish List' into your 'Starter Kit'  and join the fun of Stampin' Up!® 


Start With Savings

Starter Kit Promotion

Available 'til Nov. 30th 2021

*  The Stampin' Up!® Starter Kit is being discounted to $100 (normally $135)

*  Choose up to $165 in Stampin' Up!® products of your choice

***Yes that is a $65 shopping spree! 

Just in time for Christmas - it's like a gift for You from You***

*  Your kit will ship for free and there are no taxes in most provinces!


Please click the image to join Lesley's team


To order the $100 Starter Kit and Join my Stampin Trixsters Team,  please click here 


For more information, please email me at lesley@stampintrix.ca

I'm always happy to talk about the products and the company I love!  


Questions?

Do I have to teach classes or demonstrate the product - No, you are simply purchasing a kit of supplies.  I welcome all hobby enthusiasts to our little community.  Choose the supplies you want in your kit and enjoy the ongoing perks Stampin' Up!® offers, or choose to move your hobby to a business, it's totally up to you.   

Will I receive ongoing discounts? - Yes 20% future orders.

What's the catch?  - I've heard there are quarterly minimums - what does that mean?  Stampin' Up!® demonstrators receive 20 % off their purchases.  To be eligible for the discount you need to spend $300 every 3 months.  - However - this Special Promotion is extra special because it's November -  part of the way through the final 'Quarter'  of the year.  That means you don't need to spend your qualifying $300 until April 2022. 

Enjoy and have a super day!

It's Gift Gift Time & Seasonal Sale Time

Hello and thanks for visiting!

It's gift giving time! & I have a super fun gift card holder for you. Plus, please check back on Monday, November 15th 2021 for the matching card! 

This gift card style is from Mary Fish, find her design at Stampin' Pretty.  I've changed Mary's idea up a bit, thanks to more inspiration from Patty Bennett, find Patty's design measurements at Patty Stamps.  

My card holder uses the Painted Christmas DSP, click Lesley's Online Store to purchase this paper.


And here's the project details:


3 1/4 x 11 Evening Evergreen Cardstock (CS)

3 x 10 3/4 Painted Christmas DSP

2 x 2 1/8 Evening Evergreen for the label

1 7/8 x 2 Basic White layer for the greeting

Stamp Set of choice, I used a greeting from the October Paper Pumpkin Kit called Painted Christmas

Christmas Season Stamp Set - for the Holly berries

Real Red Ink

Real Red Mini Ruffled Ribbon


Assembly & Trix:

*  Adhere the CS and DSP together then score at 2 1/4 x 7 1/4 ***Trix, does the DSP have a directional pattern?  If so score the paper to ensure the pattern flows in the same direction, I wish I had scored mine differently - can you notice?   :)

*  Seal the flap on the two sides to create a pocket, use a strong adhesive such as Tear n Tape

*  Stamp the greeting - mine uses Real Red and adhere to the top flap with Multipurpose Liquid Glue

***Trix, I used a mask to cover the centre of the label and stamped Holly berries around the edges.  Remove the mask and stamp the greeting.  If you'd like to see this technique demonstrated please watch my Facebook Live video here, Lesley's StampinTrix FB Live
 
*  Tie 12 inches of ribbon around the gift card holder to secure and add a festive feel.

Enjoy & be sure to watch my blog for more 'It's Gift Time' ideas in the next few weeks.  I hope this simple gift card inspires you to create a few gift cards for those special people in your life :)  


It's time for the Stampin' Up!® Seasonal Sale


Click here to shop Lesley's Online Store


To watch a video from the Stampin' Up!® home office please Click Here  


Please remember to use the Host Code G6FBHW3E in the month of November.  If your shopping bag is $60 or greater I'll send you a little thank you gift in the mail the following month with your thank you card.  :)


Enjoy & have a super day!

Wednesday, November 10, 2021

#OnStageAtHome event

 Hello and thanks for visiting!

I received today's card and gift from Genevieve Ko, my team leader, for our OnStage event!  This exciting event starts tomorrow evening and runs through to the end of the day Saturday - it's kind of like our Yearly Convention with Stampin' Up!®   I hope to be posting pictures in the next few days of our creations and fun, so please check out  Lesley's StampinTrix,  on Instagram, or my Facebook Business page here, Lesley's StampinTrix.  And of course you can find my projects on Pinterest too right here, Lesley's StampinTrix 


Gen's card is a single layer card, great for a quick postcard or note to a friend or you could certainly turn this into a book mark.  She used the stamp set called 'Create With Friends' - perfect!  I love the combination of fonts in this stamp set, it's so versatile.  Click here to see it on my online store .  The paper Gen used is called Blackberry Beauty Specialty Designer Series Paper.  Click here to see it on my online store

Here's the little gift Gen sent, it's a pack of Foam Adhesive Strips, in an envelope of Blackberry Beauty Paper!  Love it!  


If you love to create cards, and would like to join a supportive community of crafters consider purchasing the Stampin' Up!® Starter Kit.   

Stampin' Up!® is offering the Starter Kit for $100 Canadian until Nov. 30th 2021  

Simply create your own Starter Kit with $165 worth of products of your choice and pay $100.  There is no tax (in most provinces) and it ships for free.    Simply a super value!  


Here are a few questions I'm often asked?

*  Do I have to teach classes or demonstrate the product - No, you are simply purchasing a kit of supplies.  I welcome all hobby enthusiasts to our little community.  Choose the supplies you want in your kit and enjoy the ongoing perks Stampin' Up!® offers, or choose to move your hobby to a business, it's totally up to you.   

*  Will I receive ongoing discounts? - Yes 20% off your future orders.

*  What's the catch?  - I've heard there are quarterly minimums - what does that mean?  Stampin' Up!® demonstrators receive 20 % off their purchases.  To be eligible for the discount you need to spend $300 every 3 months.  - However - this Special Promotion is extra special because it's November and we're part way through the final 'Quarter'  of the year.  That means you don't need to spend your qualifying $300 until April 2022. 

*  How do I learn more about this special?  -  Email me at lesley@stampintrix.ca - I'm always happy to talk about the products and company I love to work for - this truly is the best job I've ever had!    Or  Click here, to Join our Stampin Trixsters group


 Enjoy & have a super day!  See you on the socials :)


2025 2027 In Colours

 Hello and thanks for visiting! The 2025 to 2027 In Colours are coming! May 6th.  As demonstrators we're able to preorder from the catal...